Does your overall feel baggy? Maybe it feels a bit slack around the waist? The good news is that there are different ways that you can be able to make the overall tighter around the waist. Indeed, you even make the overall tighter without sewing or with sewing.
In this article, I discuss different methods that you can use to make the overall fit better around the waist.
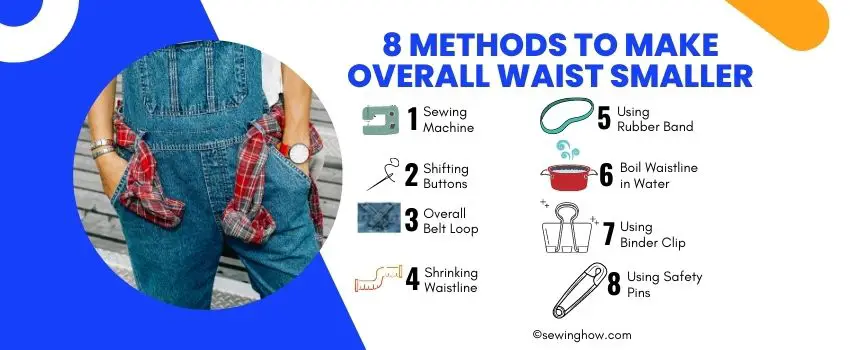
8 Ways To Make Overall Waist Smaller
Method 1: Tightening Overall Waist By Sewing
Step 1: Remove overall’s center belt loop – if your overall has one. Put the loop in a safe place as you will need it at the end of the process.
Step 2: Using chalk, draw a vertical line where you just removed the center belt loop. Make sure that the line is straight – you can use a ruler.
Step 3: Try on your overall inside out. Make sure that you wear the overall as you would typically do so that it feels baggy around the waist. Pinch the fabric to determine the amount of fabric you will need to remove. You can stand in front of a mirror to see and determine fabric to be removed to ensure your overall will be tighter around the waist.
Step 4: Hold the fabric together at the back of your overall waist. Use your chalk to indicate edges that are gathered on the waistband.
Step 5: Take off the overall and use a tape measure to establish the fabric to be removed. Divide the measurements you get by 2 so that you then mark the fabric to be removed on each side.
Step 6: Using the chalk, indicate the wedge you must remove. The wedge measurement will be determined by how much you want to size your overall waist.
Step 7: Unstitch the stitches around the section where the waistband joins the yoke.
Step 8: Use scissors to cut the waistband. If the care label of the overall is in the middle of your waistband, you can remove it carefully without cutting it – you will need it when it comes to cleaning the overall.
Step 9: Unstitch the center seam right to the bottom of the wedge. Once you have unstitched to the bottom of the wedge, make sure that the remaining threads are tied to ensure that the threads will not unravel more.
Step 10: Use pins to hold the areas you have removed the stitches from horizontally. Use pins to hold the wedge you had drawn with chalk.
Step 11: Start stitching at the crotch and proceed upwards.
Step 12: After you have finished sewing the new seam, use scissors to cut off any excess fabric on the edges.
Step 13: Secure the seam while making sure that it is balanced – we don’t want to have a bigger side than the other.
Step 14: Finish the seam by adding another line of stitch.
Step 15: Put back the center belt loop you removed in step 1.
Method 2: Shifting Button Positions To Make Overall Tighter Around The Waist
In this method, you will use button positions so that the overall will be tighter around the waist.
What you will require
Needle
Sewing thread
Buttons
Chalk
Step 1: If your overall has buttons along the waistline, remove the buttons.
Step 2: After removing the buttons, fit the waistline to find the best position of the button where the waist of the overall will be tighter as desired.
Step 3: Use the chalk to mark the positions of the button.
Step 4: Sew the buttons in the exact positions marked with the chalk.
Step 5: Wear the overall and confirm that the waistline is now tighter as desired.
Method 3: Use The Overall Belt Loop
Step 1: Wear the overall as usual.
Step 2: Use the belt loop that is next to the button and pass it over so that you can hook it. Even if this method sounds basic, it will make the overall tighter around the waist.
Step 3: When the loop is on your button, you will pass it in the buttonhole.
You will find that this method makes your overall fit better around the waist. If the overall does not have a provision to use a belt, this method would be ideal for you. Moreover, the procedure can be suitable in situations where the overall does not look as good as desired if you put on the belt.
Method 4: Shrinking Overall Waistline In The Washing Machine And Dryer
Over the years, shrinking has been used to make clothes that run big smaller. The fibers that make up your overall fabric can shrink when they are subjected to a lot of heat and moisture. Here is how to do it:
Step 1: Place your overalls in a washing machine.
Step 2: Set the washing machine to the hot water washing cycle.
Step 3: Turn on the washing machine and allow the wash cycle to end.
Step 4: Set your dryer settings to the hottest temperature setting.
Step 5: Once the wash cycle is completed, take the overall out of the washing machine and place it inside the dryer.
Step 6: Dry the overall in the washing machine using the highest drying temperature cycle. Halfway through the dry cycle, remove overall and check whether the waistline is your preferred size. If not, place the overall back and let the drying cycle complete.
Step 7: Once the drying cycle is over, take the overall out of the dryer. If you still need the waist of the overall to reduce further, you can repeat the process.
Method 5: Using A Rubber Band
Step 1: Wear your overall as you usually do.
Step 2: Take your rubber band and pass it on the buttonhole if the overall waist is big and you struggle to button it.
Step 3: To make sure that the rubber band is tightly held on the buttonhole, tie a knot.
Step 4: Peg, the rubber band around the button of your overall waistline. You will note that the overall now feels tighter around the waist.

Method 6: Boil The Waistline Overall In Hot Water
In this method, you will use heat from boiling water to create tension on the fibers along the overall waistline, thus making the overall tighter around the waist.
Step 1: Boil water in a large basin. The basin should be large enough to ensure that your overall waistline is fully immersed in hot water.
Step 2: Once the water starts to boil, put the overall waistline in the boiling water – only the waistline should be in the water.
Step 3: Use metal tongs or a large wooden spoon to fully immerse the overall waistline in the hot boiling water.
Step 4: Agitate the overall waistline in the boiling water by using a wooden spoon or metal tongs.
Step 5: Leave the overall waistline in the boiling water for at least 5 minutes, and then remove the basin from the fire.
Step 6: Let the overall rest in the hot boiling water for about 25 minutes while the fabric is fully immersed in hot water.
Step 7: After 25 minutes, take off the overall from the hot water and place it inside the dryer.
Step 8: Set the dryer to the highest drying temperatures and turn it on.
Step 9: After the drying cycle is over, take the overall out of the dryer and try it on.
Step 10: If the waist of your overall is not yet tight enough, repeat the process to get the waist tighter.
Method 7: Using A Binder Clip
Step 1: Wear your overall as usual.
Step 2: To find the best fit, hold the overall by the top of the waist. By squeezing the overall, you will be able to find the right fit.
Step 3: Use the binder clip to clip the desired tightness around the waist.
Note that this method is not permanent as the binder clip can be removed. Moreover, the binder clips will be visible to others means that this method could only be used when working alone or with people with whom you are used.
Method 8: Using Safety Pins
You can use safety pins to tighten the waist of your overall temporarily.
Step 1: Wear the overall to feel how the waist feels.
Step 2: Grip one side of the overall around the waist and find out the surplus amount of fabric.
Step 3: Grip the other side of the overall around the waist and find out the surplus amount of fabric.
Step 4: Use safety pins on both sides of the overall waist to tighten the waist.
Concluding Thoughts
Different people have different views and opinions on how overalls should fit. Some people want their overalls tight, while others want the overalls loose. If you want your overall to be tighter around the waist, I have detailed the different methods you can use to make the overall waist tighter.